Saturday, January 28, 2012

Traveling Randoms PART 2

Im here now. Sunny Long Beach. Waiting Waiting for the tv delivery man so we can our grab some coffee and an everything bagel. Oh yeah I said it. "THE EVERYTHING BAGEL" Who doesn't love these? I mean they have it all:) Literally. It's one of Trish and I's traditions when we hang out .
So the plane ride...not so good. I would like a full refund on the five dollar "Motion Sickness" medicine I purchased. Now that I think about it it didn't say. "Motion Sickness RELIEVER"  Well duh! I must have bought something that CAUSES motion sickness:) Cause who doesn't want a little taste of that sometimes.....
So I was fine until the Final Descent. It was not pretty. My whole body started sweating profusely, my leg was tapping out of control. Ill bet at this point the ladies next to me either thought 1.) I was scared to death or 2.) I had a bomb strapped to my chest. They figured it out soon enough...............when I had a plastic bag strapped around my entire face. Literally. Really seriously. I started rummaging through the pocket in front of me when I knew the horror was coming. All I could feel around for was the stupid inserts from my magazine I had stuck in there. So I grab the bag that my magazine and snack came in and start pouring it out onto the floor. And then it happened. 4 times. I was so humiliated I just stuck my whole head into the bag. ( I was thinking about my friend Kelsies advice 20 minutes before about asking for a trash can so you wont gross people out.) Then we landed. The two women would not make eye contact with me and my eyes were watering. I then looked up and saw the white bags in the seat in front of me that I had mistaken in my panic for paper. The airplane not only has chinced up on the bag quality so badly that I thought they were magazine inserts, but it was so dark on the plane I had no way of seeing them until the lights came on when we landed.
It was not good. It was gross and I am now dreading the plane ride home for I know my fate. Ew.
I did however get driven directly to my favorite restaurant, PF Changs and refueled my stomach for 2 hours:) mmmmm. And I tried this desert for the first time. OMG. Delicioso. Banana wantons with Carmel sauce, vanilla ice cream and HUGE berries.

Yay for PF Changs.
Boo for barf.

My random traveling thoughts..part 1


*I wrote these ramblings last night on my way to Long Beach....they are RAMBLINGS. My friend says that's when I'm at my funniest...I was texting her not stop and she told me to blog it. That may be her way of telling me to shut up...but I'm good with it. The only problem is that sometimes I need to be censored. She doesn't  think so, but shes just that kind of girl:) The next few days will be random...so bear with me. I'm trying something new. Here goes.....
I'm in the Las Vegas airport. I'm bored. I'm scared that I may have to use the white bag again. That's embarrassing. I also have to pee. I hate airplane bathrooms. What if they suck u in? Or you get locked in? Hold it, or pee? That is the question. Then there's the seating worry. Who will I sit by? Will they want to talk too much? Will I want to talk to much? Should I pretend I'm mute? Yes...that's what I'll do:)
I'm going to pee. Pause please...
That's the third time since I got here. That's how much I hate the plane bathroom....the plane monster.
Then there's the armrest issue. Who gets it? First come first serve ? Bigger guy gets it? I'm finding its a "nice guy finishes last" kind of thing.
and  there's the complimentary drink....should I? Its free.....but then will have to pee!!
I'm the first in my row....window seat..yes! Thanks Trish!  ooooh, someone enjoyed some garlic delight today and for once it wasn't me:)
Oh man that's bad. Note to self: Don't do it to your neighbors before your flight!
Two people offered to help the girls on front of me life their bags up. So nice that there are still nice people  out there.
Ok, the two ladies are here. She got the armrest. Thats what you get when youre on your phone:) I got the window one though..Im good:) Its the middle seat thats the bad one.
Electronics off....peace out.

Friday, January 27, 2012

#13, Armoir

I got this armour yeeeeeears ago from my bestie, Trish. I just love it. When we were about to move down here I decided it needed to be painted. My only mistake was not sealing it before we left. Holding our tv in our room I didn't really think it needed it. But the move did not do it well. It is covered in scratches, chips and dirtiness.It didn't help that it got loaded and unloaded a few more times than planned and sat in storage for 6 weeks....poor girl. I wanted to paint her a pale gray, but it ended up being a little bluey-gray. I love it though with the black hardware. When we move back she will have to be done again and I'm thinking of a darker gray or distressed white for in my craft room. Here she is before and after.
(Please excuse the mess and lack of props. This moving thing (and moving again thing) has made the furniture pictures a little less than par. In about June we should be back to better quality:)
#13 down. I may need to speed things up. I feel the big 3-0 speeding up on me like a tornado.  (does that make sense?)
And I've been thinking lately...What will I do when my 30 before 30 is up?!??!?! A new countdown....a new goal perhaps. Maybe a goal of how many to sell.....ANY IDEAS from my 'faithful??'' readers? I know theres more of you out there than admitting it:) I have stats people...I know there are more than 18 of you reading...FOLLOW ME!! :) I was very excited to find that I had 1,050 page views last month! Off to Long Beach for a weekend of DIY decorating and moving!!!

Wednesday, January 25, 2012

#12, almost half way there!

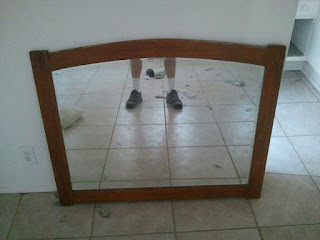
I finally painted this mirror in my room. And I think its MUCH better....


I dont have a picture of this mirror before..darn it. It was laminated wood, like this kind of a look.
I FINALLY got it painted after having it in my room for over a year. I love her.
For whatever reason it doesnt like to stay put, it wants to spin and lay flat....I have to figure out some kind of bolt, washer combo to fix that. Thats is why you will see those little fabric flowers stuck in the side:)

Saturday, January 21, 2012

Memo board

I finally made one of these cute boards to put grocery lists on. Its just a frame I painted(to match my new kitchen mat) gray, and put fabric on the inside.(or scrapbook paper.) All the great fabrics I wanted to use made it too hard to read the writing. Maybe I just need some new dry erase markers:)
I'm Loving burlap so I find any reason I can to use it. It made it really easy to read the words here. Once I get new markers I may try one with a cuter fabric. I did use the fabric from my may to tie in the colors with a tie.

Friday, January 20, 2012

Valentines decor for free..with a coffee filter wreath tutorial

Decorate for valentines day? What?It seems kind of strange, but I'm always so sad about taking down the Christmas decor that I'm excited to get something else pretty put up. And it gives me more excuses to try new DIY's:) So this year I wanted to do it on a budget. And the budget I decided on was FREE. My favorite kind. I had ALL of this at home already.
First I made a coffee filter wreath. (Easy peasy tutorial down below.) Everyone in blogland is doing these, so thought my house was probably wanting one too. I think I heard it calling for one. Then I made a little string of hearts to put on it, got a few red frames together and ta-da....Valentines.

Oh, but we're not done yet. Emma and I decided to go around the house and find everything that was pink and red and make a little display out of it too. Here were our finds:
We just filled a glass picture and stacked some more on a cake stand.
And here's our little Valentines display for the top of the girls play kitchen, made with Emmas love:)


There are billions of helpful tutorials out there on these coffee filter decorations, so why not one more:

All I did was take one of these wreaths I got at a garage sale(3 for $1!!) , about 125 coffee filters (A pack of 160 at the dollar store), a hot glue gun and sticks, a big fat marker(or any tip)  and about an hour of your time.
I had to use the yarn and scissors to cover the wreath. This one had the plastic taken off, so I put some saran wrap on it. (less mess)
The you just take your marker and gather the coffee filter around it like this:
Then you put hot glue on that whole surface(the size of the marker lid) and stick it on the wreath.(hold for about 5 seconds) Do that all the way around it and that's it!
One thing I learned when I made a lampshade in THIS post was that you can do it with a pretty big tip.(I used a smaller one, and it took waaay too long) You also don't have to have each one touching the next. I leave a tiny space in between and it still fluffs out enough that it looks great. My lamp ended up so tight its crazy! And I used way more time and way more filters than I needed to.

We have also been scribbling hearts and love messages on all our chalkboards at home. So for a whole month....Love is in the air.

Wednesday, January 18, 2012

The beginning of Macies fashion line....watch out Project Runway

My girls, like most I'm sure are obsessed with their baby dolls. They take them to the store, the park, the daycare(me) anywhere we will let them. Macie has been wanting me to make hers some 'fashioning"(her word, not mine.) So yesterday, I got out some old baby clothes I keep saying I'm going to make another quilt out of, and thought I could redo some of them. That way, they actually look somewhat like clothes:)
So I got the stuff out, got in the mood for sewing...and my machine kept jamming. Me and sewing machines....we don't get along:)
So, we got out the hot glue gun and made this for the time being. Macie was oh so thrilled with it.


More to come from Macies baby 'fashioning' line:) The sewing machine and I are going to have a talk today......

Tuesday, January 17, 2012

My house is a mess....

I guess this means I must be a great mom today!!!!
(instead of cleaning today we walked around target(looove) had a tea party, went in the hot tub and watched the Chipmunks twice:)

Sunday, January 15, 2012

A beautiful Sunday!

The girls had their first playdate since we moved here last weekend. Macie met a girl in class named Leila and the two have just clicked. She has a little sister, Brooklyn, who is Emmas age to play with and a cute little baby boy, Levi. We went to the park for a few hours and Macie asks everyday when we can play again. Yay, for little friends!!

So fun! Look at all those smiles!!!

Friday, January 13, 2012

Dremmel love

I got a dremmel for Christmas and am soo excited to get to using it. I went onto my addiction pinterest to get some ideas (of course I didJ ) I cant believe the stuff people can make. Check these out:
via
via

via
Awesome stuff right??

 I want to try to get some plain metal jewelry penants and cut out some initials in them. Im not much of an artist, so these are just things I saw that I thought were so creative. I also thought I could do some cool signs like this love one. Cut out the girls names, or our last name.  So many ideas......so little time.

Thursday, January 12, 2012

Vinyl Floor Mat Painted...A Tutorial

I've done it again. I started making something....I love it so I'm already onto another. Too bad I don't have many hard floors in my house. I would love to do a large one of these in a family room or play room. Someday maybe:) I saw this on pinterest.
via

How beautiful of a playroom is that?? It got me thinking....
My whole point of doing my crafts is to make beautiful things rather than spending insane amounts of money on someone else making them. Well, this kind of flooring.....still mucho expensive. So I saw the word vinyl and thought.."I'm going to just TRY it with my plain ol linoleum remnants I got. And....i think it turned out pretty darn cute.
The pieces I had had some grooves in them in the pattern. The same one I had for THIS project. So, I just turned it over and did it on the underside....what could it hurt right? I painted it first with 'Bullseye' primer and sealer. I usually use this for priming fake and laminated furniture so the paint will stick....so this might work:) Then I just used plain ol latex paint I had from all my furniture projects. I did a white coat underneath, and then taped off the pattern I wanted. I was going to do black and white, but hate how every little thing shows up on black. So I decided to mix some black and white I had and made my own gray. I looove it.
The taping off took me the longest, because me and numbers....not best friends.

I used my frog tape because I-LOVE-IT. It has never torn off any paint underneath...and I have never had the paint seep under it. Its great. I didn't want to waste it so I taped the inside with my hubbys painter tape.
And here it is:
Right next to the one from THIS post.
Then I just did about 5 coats of polyurethane. This way I can wipe it clean and the paint wont chip.
What do you think? Anyone else of think of painting crazy things?

Linking up to:
My repurposed life 

Wednesday, January 11, 2012

I made my bed........


What a difference making your bed can make. I know it sounds silly, but if I get up, take my shower, have my coffee and make my bed, I feel like it motivates me to go get things done. The room is done, now onto the rest of the house. Am I weird?? Or maybe I am the only one that wasn’t making my bed every morning and now Im normalJ

I tried to join the chevron band wagon this week. That pillow was the start.
Now if we I could only get a bed frame put up:)

Monday, January 9, 2012

BE


My favorite mug:) It was actually my quote in my high school year book. I just love it. I was drinking my coffee the other morning, blogging, and it got me looking at it. Really LOOKING at it.
 I try, but I need to really try. I have found that if you practice something enough, it becomes habit.
(It worked with stopping my overuse of the word 'bastard', so that should count, right?)
So this starts my list of resolutions for the year. To really focus on this.

"Be the change you wish to see in the world."

Sunday, January 8, 2012

DIY kitchen mat (a tutorial)

I am always looking for kitchen rugs….I feel they make a room. They can make it more cozy and warm, they can bring a new color into the room, and for all you who are the dishwashers of the house, they can add some comfort to those not so fun, much too frequent times at the sink. I have found a few I love but am not willing to pay the big price on the tag. The other ones are always too small, the wrong color, cheaply made and just plain wrong. So, I'm so excited to have finally made one that perfectly fits my needs. Our rental has some old linoleum i cant seem to make look clean no matter how much i scrub, so it is in dire need if some coverings.


I searched on pinterest and found some beautiful DIY rugs. My kids and husband keep correcting me because it is not fuzzy, it is not a rug. Ok, how about mat.
I loved this fuzzy one made out of old t shirts, but when I looked at the tutorial and found out it took 60 hours(!!)Yes, 6-0!
I decided this one would have to wait.
via
 I decided against it for the time being. My family is also very prone to spills, so the carpet in the kitchen idea is a little gross for us. Kind of hard to clean, and too many times in the wash makes for a short life span.
I also found these ones I have been wanting to do for awhile, but they can be a little bit spendy because of the size I would want it. I think I would do this kind more for a living area than a kitchen. They are made out of those kids foamy play pads!! And then painted and sealed to be used to bring soo much life into a room. Aren't they spectacular?!?!
via

via

 I have been looking into these pads at toys r us, wal mart, target and ross. They are about $20 for 4, but all he ones I have found have the jagged puzzle edges. Someday I think I will attempt one like this. I would like to have hardwood floors to have one on.
Then I found this one from this wonderful blog.

via
 Click on the link above(via) It takes you right to the directions. I will only add a few tips to them that I found out along the way, her directions are very detailed. She actually did this one with a plain piece of duck cloth that she hand painted this stencil on. I just used my favorite fabric I had and skipped steps 3-9. Here it is:

I just love all that it adds to the kitchen. In short, its just a piece of vinyl flooring remnant, fabric glued on top, and sealed so that it can be cleaned with a wet cloth.
I went to Lowes and got this piece of vinyl left over in the Clearance bin.

 It said it was on sale for .42 a square foot. Then the price said 5.62. It was 12’ long by about 4’. Didn’t add up to me, but I threw it in the cart, excited for a bargain. When I got up there the guy was all sorts of confused. I of course couldn’t help much, (those of you who know me know I failed one of my college math classes…. twice…eek! I still blame it on the fact that one man was the most boring, monotone speaking man Ive ever heard and I kept falling asleep. And the other a woman with such a strong foreign accent, she said “Fuctorization” 20 times a day, who can focus with that?!?!) Anyway, it rang up at $64. He kept saying that it was .42 cents a SQUARE foot and this was not a SQUARE piece, but a rectangle. Well, duh, buddy. He must of failed college math too. He finally had to call someone else and it came out at $8 and some change. Still doesn’t make sense to me, but Ill still take the bargain. I had to get spray glue. I got the cheapest one, which was $6 instead of the stronger holds which were around $16(yikes) This turned out to be a good thing. Here's my one big tip if you decide to make one of these (which you totally should) I cut the fabric, glued it on and taped it like in the instructions. But when I put the first coat of polyurethane, the fabric started shrinking. Then the vinyl was buckling underneath the fabric and the whole thing was curling. Bad. Bad. Bad. So, luckily, because the glue was not super strength, I peeled off three sides of it, so that it would do all its shrinking and then I would glue it back on. I ended up doing 6 coats of poly, one every 2 hours. I wanted to make sure it was completely sealed, since there is so much white. That way I can wipe it off and disinfect it for years to come. I also would have painted or just primed the vinyl first. When the fabric was wet with poly I could see a little of the brown squares poking through from the vinyl, but as it dried it is mostly gone. I then glued and taped the three sides back once it had dried overnight.
Sorry, this post I thought would be a quick one turned into a novel. I have so many interesting experiences trying all these DIY’s I cant help but share them. Now, go make a mat, give your kitchen some life!!

Saturday, January 7, 2012

Mirror, Mirror on the wall (19)


Ever make something to sell or as a gift and then you want to keep it? That’s what happened to me with this mirror. It turned out so cute, when I went to take pictures of it, it just made my room a room. But I made it to sell, so its currently up for grabs. Here it was before :

And here it is now.

$70

The hubby showed me some new distressing techniques and it looks so cool. I really need to invest in a better camera. These pictures don’t give it justice. I don’t think anyone in this town reads my blog now that we’ve moved….but jut in case….if you live in the Vegas area this mirror is for sale. The measurments are 46’w by 36’h. Its huge! Its all real wood, so its very sturdy. I have it here as a dresser top mirror, but I think it would be great on the wall above a couch or fireplace also.

Friday, January 6, 2012

Long beach came to Vegas!


My good friend Trish and her kiddos finally got to come to see us here. We had a limited amount of time, but squeezed in as much as we could while she was here.
We tried our hand at making some custom crib bedding for a friend of ours. It was quite the adventure, but it turned out way cute.

We also went to M and M world and watched the movie, went to see the Lions at the MGM Grand and got the laugh of a lifetime from Trish daughter Abbi. Im so bummed I didn’t get any shots, but she was so hilarious on the strip. They have all these characters walking the strip so you’ll pay to have your picture taken with them. Abbi was dancing with hello kitty in her cowgirl boots. Everyone walking by was laughing so hard. It was the cutest thing!

3D baby
No, those arent our children climbing on the wall...hehehe
Oh the blackmail:) I cant believe these are the same two blondies we have
 pictures of in the bath together before they were even 1!!
Thanks for the visit guys!! Now come back!!

Thursday, January 5, 2012

Christmas in the desert


The girls had a great Christmas! One of the highlights of it all was their shock when they walked into this:

They didn’t know what to do. I don’t think they quite realized who they were for. They are complete with their names on the license plates and “Princess” plates on the back. They have been riding them around the neighborhood non stop.
They were also just as thrilled every day when the mail came. It was amazing the love we saw in that mailbox in the days leading up to Christmas. Thank you everyone who sent them something. When a card came with their name on it, they ran home, yelling as they opened the door to go show daddy.
What a great time of the year with family and fun!!

And we again ate waaay to much delicious food! Thanks grandma!!!

Wednesday, January 4, 2012

Black and nude

I am obsessed with black and nude....clothing and decor that is.
I dont have anywhere to wear pretty things at this moment, but someday soon I will. Im not sure where yet, but I will:)


I need a party to wear these to.


And a job to wear this to.
(I like being able to work in sweats for now, but a girls gotta dress up sometimes:)


Totally different than the look Ive been going for, but is this room beautiful or what?? Maybe when the kids leave us and we need something more swanky. Ill have to reapaint all my white furniture black.


IN LOVE with this. Someday....
 
SITE DESIGN BY DESIGNER BLOGS