Im so excited about this project! I have done one previous pallet project here and am now hooked. I have wanted to make a subway inspired sign for awhile now, and finally had all I needed to make one. My friend gave me a cricut (score!) and my dad found me the perfect pallet! Now I know subway signs have street names, or locations on them but I wanted to make some with sayings on them. I have a few ideas, but this first is for my kitchen.
Here's the how to:
Here's the how to:
Start with a pallet or piece of plywood:
I sanded this one down with a 100 grit just to get the big sliver chunks off. I was going for a distressed look so didn't make it perfect on purpose.
Next I painted the whole thing white with a small roller. I decided to use the actual letter for the stencil and not the stencil part. My letters were huge (up to 6 in.) so I thought that would be easier and save some vinyl rather than use the negative of the letters. So, in this case, I painted the base the color the color that I eventually wanted the letters to be.
Next I cut out all the letters with paper first so I didn't waste vinyl. I only did six words, so wanted it to fill up the space and knew I would have to adjust my letter size depending on the length of the word.This part was pretty time consuming. Almost 3 hours!
Then its time to cut out the vinyl letters (on my awesome cricut machine!) and attach them to the board. I measured half way down and did the middle line of letters first, drawing a straight line on each row to keep them even. You can use contact paper which helps keep your letters straight, but I didn't have enough to do this whole thing, so I placed them by hand, which was also time consuming. (This took 10 feet of 8 in. vinyl, so I didn't want to use that much contact paper) Here are all the letters layed out.(the vinyl I used is gray and sticky on the back)
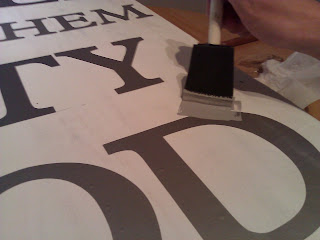
I smoothed them all down so no paint would seep under and then mixed up my own shade of gray since I didn't have any on hand. Now its time to paint. I started with a foam brush only painting outwards away from the stencils.
And then quickly decided that this would leave weird brush strokes and take forever. I realized that I spent so much time making the letters perfect that I should be able to paint right over them and be fine, so I grabbed a regular paint brush and painted on two coats right over all the letters.
Now taking them off is a little tricky. You don't want the paint to be dry because then the vinyl could take chunks of paint with it. But if its too wet, its hard to get a start on the letter to peel it off. So I got some tweezers and carefully peeled them off.
And here it is in the kitchen.(on the half painted cart I'm working on.......that coming soon)
I decided I wanted it to look even more distressed. I took a fine grit(220) paper and quickly went over the whole sign to roughen it up a little. I can see myself becoming a sign making fool. More to come soon I'm sure.......
I want to do some black ones with distressed white letters. Here's kind of what it would look like. I cant decide which I like best, so I guess I'll just have to make another one:)
Partying at:
My uncommon slice of suburbia
The Ivy Cottage
Primp
Miss Mustard Seed
Somewhat Simple
My Repurposed Life
Redoux


I love this project, you can cook me tasty food anytime! Thanks for linking up.
ReplyDeleteXO
Kristin
Yay!!!! LOVE LOVE LOVE!!!
ReplyDeleteyour sign looks great! I love the sentiment. :)
ReplyDeleteto keep your paint from seeping under your letters, after you apply your letters, put a quick coat of the base coat over the letters, then paint your top coat. Works great@
gail