This no Internet thing is putting quite the kink in my bloggy blog world. But I'm trying to make the best of it. Sitting at starbucks with no children (i do love them, but an hour to myself:) sipping on a carmel apple cider isn't too shabby:) I have decided to do my first official tutorial on this project. I spent so much time and put so much love into it I decided it deserved a tutJ For that reason this may be a little lengthy of a post. You may get a little sick of hearing me talk type. So if so, just scroll through and the pictures will tell it all.
I decided I wanted to make the girls their very own custom kitchen, since the girls left their store bought one at grandmas in Idaho. I started scouring this town starting with garage sales. I , of course being the procrastinator I am, waited until like a month before Christmas to decide on this plan. Last year my friend Abby posted a kitchen on my facebook made out of an old entertainment center. Since then Ive been seeing them everywhere. So I must give credit where it is do. Here are a few of my inspirations HERE and HERE.
After a full day of garage sales I decided I would need to take a different route. Anyone else notice you may see 1000 of something everywhere you go, but then when you decide you want one, they are gone. Disappeared into some black hole and not one can be found? Yep, that was me and entertainment centers. I came home with some Christmas decorations, a few wreaths, a frame, and no kitchen.
So I went where anyone else might go. Craigslist. Now I had high hopes of Vegas Craigslist. People wanting to get rid of their stuff left and right. So many more people, options and cheaper, great deals….nope. All of the businesses fill up the pages with their furniture. Expensive furniture. Not cool. But don’t worry, because there are still some normal Craigslist’ers out there. I found a cute little tv stand/center for $20 and told my hubby we just had to go snag it. I will also add that we finally met some people that gave us a little hope in this townJ The couple we bought it from were so friendly and normal, unlike most others we see here.
Here she is before:

And here's the shot of the side for dvd storage

I first got to work at a plan. Here's my sketch scribble of a plan.

This way you can make a 'to do' list in order, so you don't end up having to go back and redo things.....I will admit I learned this the hard way. (ie: having to puddy a screw hole, then re sand and repaint) It also helped me be able to go to new projects while others were drying or I was waiting on parts.
The first step was to sand. I took off all the doors and hardware, took out all the shelves and got to sanding. I used my Ridgid Orbit electric sander with 220 grit sandpaper. The only downfall of this piece was that it was fake/real wood/press board stuff. So I couldn’t sand it much or it would fall apart. I just sanded enough to get rid of a few knicks and to get the shiny layer off. Since I had drawn out a plan, I also knew where I needed and didn’t need holes for screws and such. I wanted to take the oven door and make it open from the bottom instead of the side, so I had to wood putty the old holes before painting. I also didn’t want the decorative flowers on the front of the doors to show. I couldn’t sand them off because of the fake wood, so I decided to turn then around and put the print on the inside. Luckily before I puttied all the holes I realized I could just switch the doors…yeah, I know, I’m a little slow. Time to get painting.

I painted it white.

And then a second coat

And then a third,
And then I ran out of white paintJ
My goal was to buy as little as possible for this project and try to use things I already had. So a few spots didn’t get the third coat, like the inside of the side shelves. Spots I figured wouldn’t get seen much. I had a sample size of gray and some left over yellow and pink from other projects. I had already got fabric and decided on colors, so this worked perfectly. I painted a little of each to see the dry color and layed out the fabric just to make sure.

I first painted the frame I was going to use and measured the inside of it for the chalkboard size. I taped it off and then realized I had to tape off the whole piece since I was using spray chalk paint(what I had already) The paint on would have been much easier to use in this instance, but I didn’t have any.


When the chalkboard dried I took off the tape and nailed on the frame. (You'll see a picture in a minute)
I found these mirrors at the dollar store and thought they would be great for the stove burners. After many attempts to freehand paint them to look like burners, I gave up on that idea. I found a stencil I had that I thought would work (my husband is convinced it’s a flower, but it looks burner-ish right?) After a few attempts at this and a mess each time I realized I had to pat DOWN with a brush, not brush. Otherwise it went under the edges of the stencil.


I had these metal handles my dad had given me and painted them to be the burner knobs. I Also had a bowl that I thought would make a perfect sink. My husband and father in law got me an old faucet at work. I layed out what the counter would look like and decided I wanted to separate the areas so it was more defined. I taped off some stripes and painted them yellow. This also took 3 coats.
I painted the oven door gray (yes 3 coats) and after the final coat dried I taped off a section to be the “glass” and sprayed it with chalk paint. I wanted to cut a hole out of the middle and put some kind of tinted plastic in it, but again, I wanted to use what I already had on hand.
(I forgot to get pictures of these in the process, but you'll see it in the finished pictures.)
I painted the shelves all a light gray to give a little contrast off the white.
After all paint was dry I covered it in Valspar polyurethane. I have had this can since I started painting last year, and this project finally emptied it out. It was one of the more expensive brands at home depot, but like I said, it lasts forever and it works. I love this stuff. Every piece I’ve ever sealed with it is still standing strong.
I had to get some wood for the back and for the fridge door. I decided to take my chances at Lowe's and go with the girls without the hubs. Bad idea. Bad Bad idea. I was supposed to get some ¼ “ plywood. I read the sign below it instead of on top. When I questioned the sales boy, he insisted it was “fine”. I gave him the measurements and he cut it(I appreciate that the store does this part.) but it was so the wrong wood. So, So bad. He also sat the pieces on the big long wood cart thing and walked away. So I was left standing there with my three and five year old daughters in my cart and this other rack on wheels with the wood in it…at the back of the store. Such a gentleman. It was a funny site, I'm sure. I only ran into about 4 things on my way up top the register.....
I got home, sanded the back piece and fridge door. First with 60 grit and then 220. I mixed the last of an off white and the gray and made a new color for these pieces. I love the color that turned out, so Ill pretend it was on purpose.(Again, trying not to buy too much new.) I painted two coats, then a poly coat. I got this cute handle at home depot that I thought looked like a modern fridge handle.

Tired of this yet? Cause I sure am tired of hearing myself talk about it. Lets speed things up a little. If anyone starts reading my blog and has some questions, they’ll ask right??
Next I put the shelves back in, had the hubby help me drill the new holes for the oven door, the fridge, the stove knobs, and cut a hole for the sink. I glued in the sink, the faucet and the burners. My hubby made the knobs so that the girls can twist them…super cute.
On some nights when paint was drying, I went to sewing. I made two aprons, two oven mitts, a curtain and tried my hand at some felt food. I traced an apron the girls had and just winged it. I think they turned out cute. Same with the mitts and the curtain. I had to buy a tension rod ($4 at target) and was thrilled with how the curtain turned out. I had always wanted to use these cute little yellow balls poofysJ The felt food I went to a few sites and just tried to figure it out. The fortune cookies I got from THIS site. They are Macs favorite.


I also picked up a few utensils, the glass jars and the white plastic ramekins when I saw them at the dollar store. All month I also saved jars and containers from our food and painted chalk labels on some of them. The girls seem to love some bigger stuff, since all the food they have is mini size.
I had wanted to cut a hole in the back and make a real window, but decided to do that at a later time. I already had this shelf, frame and mirror and painted them all to match. Emma got a microwave and broom set for Christmas that fit in perfectly with the kitchen.
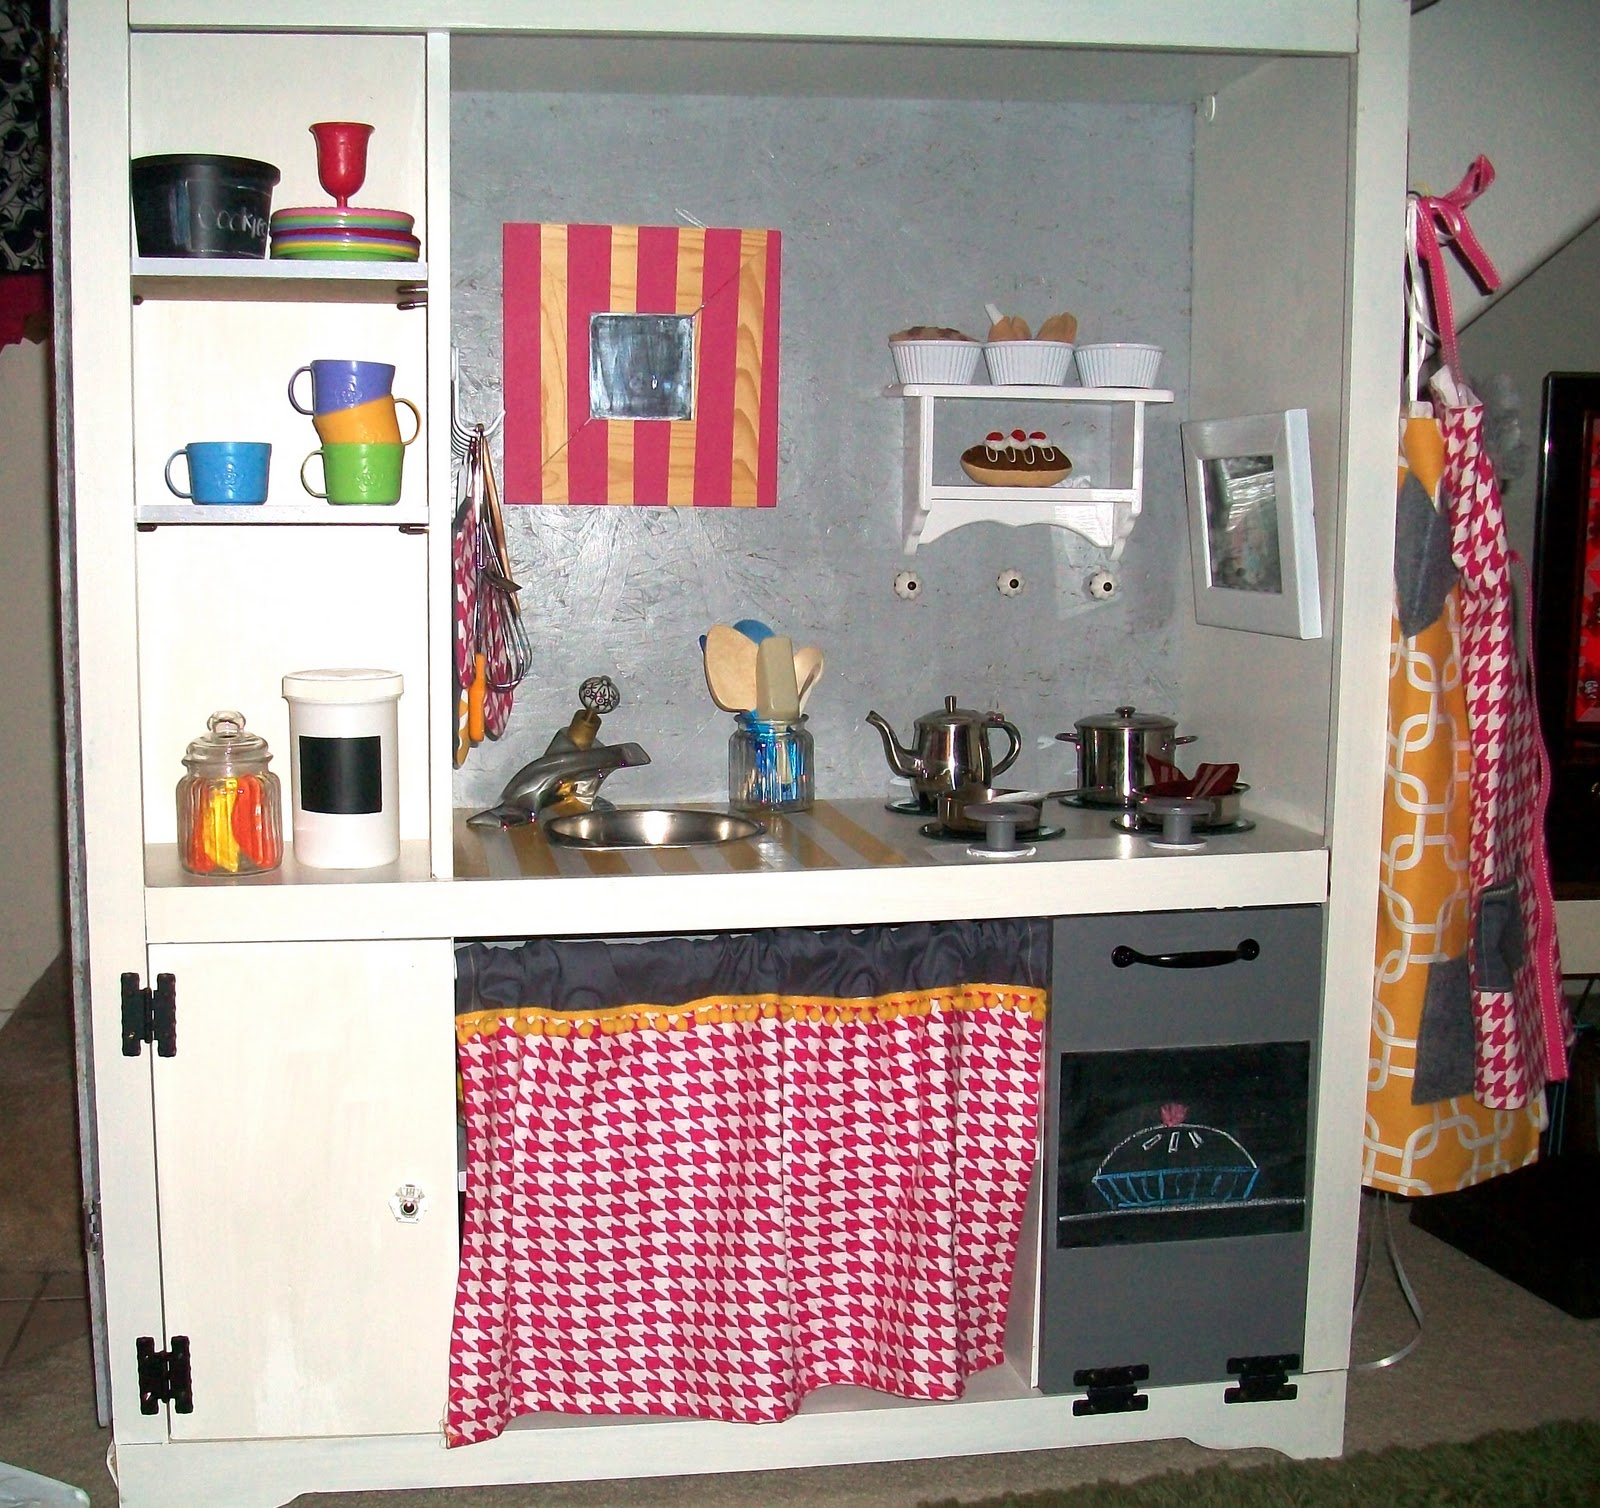
So, there she is! I worked on it every night for the whole month and JUST finished Christmas eve. I think I was more excited to set it up in the living room than the girls were for santa to come.
After trying to keep the girls out of the garage for a month, I am finally done. We moved it over by the kitchen and the girls cooked when I cooked last night.


 |
| Fridge |
I love how it turned out and more than that love that they love it.


What do you think?????
Partying over at
Miss Mustard Seed,
Southern Lovely,
Primp,
Diy by design,
Domestically Speaking
and
Redoux
Partying over at
Miss Mustard Seed,
Southern Lovely,
Primp,
Diy by design,
Domestically Speaking
and
Redoux


