Showing posts with label paint. Show all posts

Saturday, January 12, 2013

I do......

I got the wonderful opportunity to make a few things for another wedding this last summer and am finally getting around to showing you:)
 I met the beautiful bride, Katie through a friend and she asked if I could do a few pieces she had envisioned for her wedding. She had such a beautiful wedding with so many creative and beautiful details. I was even more excited when she told me that the amazing Haley Sierra was the photographer! Click on her name for her blog, or HERE for her website. If I had it to do over again, I would FOR SURE have used her. She captures the day so amazingly. I am in awe everytime I see a new shoot she has done!
I just did a couple chairs and a door for her, but make sure you click on the website above to check out the rest of her amazing day! (under Weddings:Taylor and Katie)

Heres the door she used as the entrance to the ceremony:


And heres one of the chairs. She used it to put these beautiful blankets on for the guests.


Dont forget to check out Haleys work. Youll be glad you did.

HAPPY SATURDAY!!

Tuesday, October 23, 2012

Side Board redo

I got this piece on our local Facebook yardsale sight for $15 a few months back. I have always wanted some kind of sideboard piece for the kitchen or behind the couch, so Ive been waiting to this piece for our own home. Here she is before:

I painted her gray, distressed her, took off the existing handles and drilled new holes for these new beauties.
And after:


And all decorated up for fall:


Partying at:

Saturday, October 13, 2012

How to make your own custom rubber stamps


I have always wanted a chevron stamp. Who doesn't these days right?? But the only one I could find was by Tori Spelling and was like $50. (Ill admit though, I make no apologies, I do love me some Tori)
So after seeing a few blogs on it like this one here from my ALL-TIME-FAVORITE- BLOG-I-READ-EVERY-SINGLE-DAY. I ordered a speedy carve block on amazon and my sister happened to have the carving tool set i needed. You can take any image (off the web, a magazine, a logo) and turn it into a stamp! For my chevron one I:
1. Traced some chevron fabric I had onto plain old printer paper (with a pencil, that's the important part)
You could use a printed image or anything else.
For this one I found this image online and then just altered it a little:

2. Place the paper on your carve block, image side down.
3.Rub over the image with a flat surface like a debit card.
4. Remove the image and you will have the penciled image now on the rubber.
5. Trace your image with a permanent marker or pen so it doesn't rub off while you carve.

6. Carve out the parts you want to be the 'negative space' on the paper.
7. Carve some more
8. Carve a little more

9. It will take a few practice stamps to see where you need to carve a little more. 
10. Stamp beautiful things!!
I have gone a little crazy with my few favorite images and am in need of making a few new ones.
Ive done some on paper with a stamp pad, but mostly on fabric mixing acrylic paint and textile medium.(Theres not much of a fabric paint selection in our little town. neons and puffy paint mostly, so I just get the textile medium to mix with ANY of the beautiful colors that come in acrylics! You just follow the t.m instructions, and heat set it after. 
Here are my favorite projects Ive done lately:
These directors chairs were my first project with the anchor.

Redid the curtains in my laundry room

This coffee table turned chevron bench.
Take that expensive chevron fabric!!!

Some chevron flour sack dish towels.
my price tags


Now go stamp on! I want to see some projects people:)

Thursday, October 11, 2012

Vintage vanity redo


I found this old vanity and brought her home earlier in the summer. I loaded her up in the back of the truck by myself(kind of awkward) because I knew what would happen if I asked for help with this one. And I was right. When I got home, my dad told me to throw it back and my husband looked at me like I was crazy and walked straight into the house. But come on!! My nana, grandma and great aunt were all beauticians and I kind of love me an old vanity. Even sans the mirror, hardware and two drawers. And even despite the fact that it was filled with spiders, leaves and what looked like potting soil.

And then came the silliness of it all. Those drawers will ONLY fit in those two spots. There's no moving both to one side, or moving them both to the top or bottom. So, then again, my dad said to throw it back. But I didn't:) I think she is so cute painted white and distressed and with thee old heavy handles from the Hobs. I thought about either making a fabric cushioned pad on the middle section or making cute little curtains over the shelves I made. I have tried to sell it a few times and this piece has stuck around much longer than most. What do you think? Should I make a padded top, or some curtains?? 


AFTER:


Wednesday, October 10, 2012

A nursery makeover!


I redid my sister, Robins office into a nursery a few months back for sweet baby Mckinley(who is now 6 weeks old!)

 I keep meaning to go back and take better pictures, but never have, so I figured Id just do the post already:) I will come back and add more later when I can figure out how to get pics off my old phone. I have a few tutorials I took pictures for. 

Heres the room just getting started:
(We didnt get the crib before. It was your basic wood crib and we painted it white.)

And after:(Its hard to get a shot of the whole room cause its so long.
I painted this dresser coral and white. I still plan on putting a large black owl silouette on the front, but need to find a projector. I painted the two lamps Robin already had white and then recovered the shades with some cute teal polka dot fabric. The candlesticks were pink and I painted them aqua. Right now they act as book ends.


Theres no closet in this room, so Robin came up with a great idea to utilize the space. This was originally her husbands desk, so he added a bar along the bottom to hang the itty bitty clothes.

The crib we painted white. (5 cans of spray paint later!) The bumper is 
one of those new
 breathable  ones that we got in white and I tried to dye. Little did 
I realize that Polyester + dye = no go. I had even gotten onesies and practiced before getting the bumper .
Totally different fabrics:) The velcro worked and the rest is a baby pink, 
but it actually works. I didnt want it too matchy matchy anyway.
The crib sheet was white and I dyed it coral. The curtains are a 
white with gray pinstripes(better picture to come i promise!)
 And the quilt I made one side out of this adorable dandelion silouette 
and the other side out of a piece from every other fabric in the room.
The curtains are a white with gray pinstripe with this great Amy Butler fabric
 on the bottom. It said "cherry" as the color, but I just knew it would work! 
The curtains totally lightened up the room! The gray was on sale for 2.99 a yard! 
You cant beat that and I think the flowers for the whole thing would have been too busy.


Heres the comforter on one side


I made this mobile with circles of coordinating fabrics , coral ribbon and an embroidery hoop. I just love how it turned out!
The artwork I did also. It was so simple. I just stretched some fabric over an old canvas with my staple gun(on the back), and used my cricut to cut out different sizes and shapes of flowers(and painted some aqua).
The framed flower I made out of fabric, painted an old frame and attached it to some chevron paper I stamped. Sooo easy!
The 'M' is the same paper I stamped, cut out on my cricut and attached it with some baby clothes pins to a strip of lace.


Heres the two drawers I painted, distressed and lined. I originally was going to hang these on the wall as shelves, but ran out of wall space.
So I decided an under the crib storage worked just as well.
(And the other side of the comforter)


This owl I am very proud of:) I couldnt find a cricut cartridge with an owl that had any more images I would use much. So I finally just used the basic one I have and cut out all different shapes to put him together! Isnt he cute!!? I got all these frames at garage sales this summer and painted them all white.
The "you are loved always" was a quote on my sisters pinterest, and cut out with my cricut.
The little two are just scrapbook paper and stickers I already had(with the right colors!!!)
And the 'M' I cut out of some old mat board and covered in glitter. That was a mess:)

So there it is!! Mckinley is still sleeping in her mommy and daddys room, but I know she will enjoy this room soon and her mommy already is!

And one more picture because I cant help myself:

Partying at :


Sunday, October 7, 2012

I love Brits

These pictures don't do it justice. I love the dresser redo I finally did for my hubby! I know he loves the wood look, but I'm trying to lighten up our room. So I let him keep some distressed stripes of wood:) (and a whole other wood dresser I might add.) This is the first piece of furniture I have deemed male. His name will b Prince William:) Here he is:) before and after:

Partying at :

Thursday, September 27, 2012

Rock a bye baby

The girls have wanted a baby cradle for their dolls for as long as i can remember. We got them a doll bunk bed a few christmas ago, but the cheapo plasic thing was finally breaking down. 
I got this cradle a few days ago and didnt tell the girls about it until i redid it. They were soooo excited:)  Here it is before:

I added a little embelishment to pretty it up and then Emma and I applied a good coat of gray chalk paint. And that was it!
Then of course I had to make some blankies and a piilow for the babies:)

I have some vintage fabric Ive been collecting. I love it so much that I keep 'saving' it. So I think this was the perfect project to use a little. Im made Macie the stripe/flower one and Emma picked out her butterfly/damask one:) The pillow I just traced a crown off this french graphics site and then sewed the pillow. Macie wanted a crown sign I had made, so she was pleasently surprised with the pillow. 


shhhhh, the babies are sleeping.................

Wednesday, July 25, 2012

The little nightstand that could

I found this little beauty, but she was injured. Her poor drawer was lost so I helped her through her recovery. And how better to recover than by first slapping on some coral paint!!! And then making a shelf(And using the saw BY MYSELF I might add:) and adding a cutesy paper and laminating it. Dr. Aprill saved another life:)

Before:

And after:

This didnt sell before the show was over, and I was kind of excited to take it home. I took Emmas nightstand  with the chalkboard top that was just too short for her bed and sold it earlier in the day, so thought she would be pumped to get this pretty one. But as I loaded it up in the truck a girl came back to buy it. Woo hoo for her! Sad for Emma. But thats why she has this mommy right? I can make another one:)

Tuesday, July 24, 2012

Another coffee table turned bench!

Here are a few more redos that I sold before I could even post them. Sad, because you didnt even have a chance:) But good because, well, I sold them!!
Heres another coffee table:


Turned bench!


Now of course I love the aqua legs, but my favorite part of this bench is the fabric. I made this stamp and mixed textile medium to my paint to make this one of a kind custom fabric. Chevron at its best! Thanks for the purchase Chloe!!

Monday, July 23, 2012

#30 done! while I'm 29!!

My Internet is not so reliable lately, and Ive been soo busy making making making. I thought I better do this post though to update you all. I realized that all the people that come to the sales and buy my things found out about me on some part of the Internet. Either my blog, facebook or facebook yardsale. So, I better keep up that part:) 
This blog started out as "aprills30before30" and has turned into so much more! I have met so many great people through it that understand my vision and can share in my ideas. I have also gained so many  customers through this venue and I am so thankful. I have a year left before I'm 30 and this is my 30th piece!! Through this blog I have been able to share my family, my love for food and all things DIY and design. I'm thinking about setting a new goal, but haven't come up with it yet. While its nice out and Amy over at Vintage Farmhouse is doing so many great sales shes letting me be part of, I am out in the shop much more than on here blogging!! So in the winter, I guess, I will catch up on my posts:) Here it is though, #30.

Here it is before:
And here it is after:


 I made it for my niece whos almost ready to make an appearance! McKinley Jean! I will do a post when I have more time on the nursery I designed and did for her! It is so adorable! 
Yay for completing my 30!! 
And yay for my niece on the way!!! (Sorry Robin, I know you're not so excited at the moment about being on bed rest:( Keep her in there. Ill be over to see you in two days!!! Love you!

Wednesday, June 27, 2012

Support crafters!!!

I got this awesome chippy dirty old wood the other day and couldnt wait to make something with it. I know that sounds weird, but its sooo cool looking. I love the old, the retro, the chips, the peels.....most of it that is:)
It was my dads gf's birthday yesterday so I whipped this up and have to say...I kind of want one.

I also added a few things to my little booth at Foxs Fun Factory:) I thought I'd share some of them with you to entice you to go take a look:)
Here are these rings Ive wanted to make for awhile. Thanks to W and J for my amazon gift cards I finally could order the supplies. There are rings and earrings. Each $6.50

                                                                      
Silver w/ blue flower,  gun metal with coral flower, pink with ivory flower, teal with coral flower, red, yellow and coral earrings.
I have lots more to make, but wanted to see how they would sell. Let me know what you think!

Heres my favorite chalk board I have displayed over there. 

And this cute little nightstand w/coral anthro knob

And if any of you are headed to a baby shower or to greet a new baby this summer make sure you stop by to grab one of these great wipe holders:

The Foxs crafters mall is right on hwy 200 across from the mall entrance by Deitrich. And are open Mon-Sat. 10-6. There are about 50 different vendors who sell there, so theres something for everyone!

Tuesday, June 19, 2012

#29 and sold!

I redid this chair for the Vintage Farmhouse Sale and before I even got it there it was sold! (Thanks S! Love my friends!) 

And after:


Monday, June 18, 2012

recap of a crazy week and # 26 , 27 and 28!


Its been a week since I blogged and a lot has happened this week! So I thought Id give a quick recap!
I turned 29 and my hubby gave me the most AMAZE-balls birthday ever! First a sign for my business, which makes me feel so supported in my crazy endeavors!Check it out!

I went and had my free breakfast at Panhandler pies and got serenaded by the whole restaurant(there was 3 tables , but still:)
Macie had kindergarten graduation that day and we couldn't be prouder!! Where did the time go?!


yes, Emma was having fun:)

Then, he arranged for a babysitter and took me to town to 'kill some time'. We realized we had never gone bowling together so i was super pumped to go with him.....only to sadly realize our alley had closed! So instead we went to the lovely Eicharts and had a delicious cider and garlic fries. Those things are to die for!

Then I got blindfolded and taken to .....a SURPRISE party with a lot of my loved ones! What a sneaky little hubby I have! And wonderful!!! I don't have any pictures to put up yet because once again I still cant get the pictures off that darn camera! Thank you to all my friends who helped! It was the best birthday Ive had in 29 years!

This weekend I got to be part of the second Vintage Farmhouse Sale and it was such a success! I have two big pieces that I took that are still for sale.
Here are the before and afters:

This dresser/buffet before:
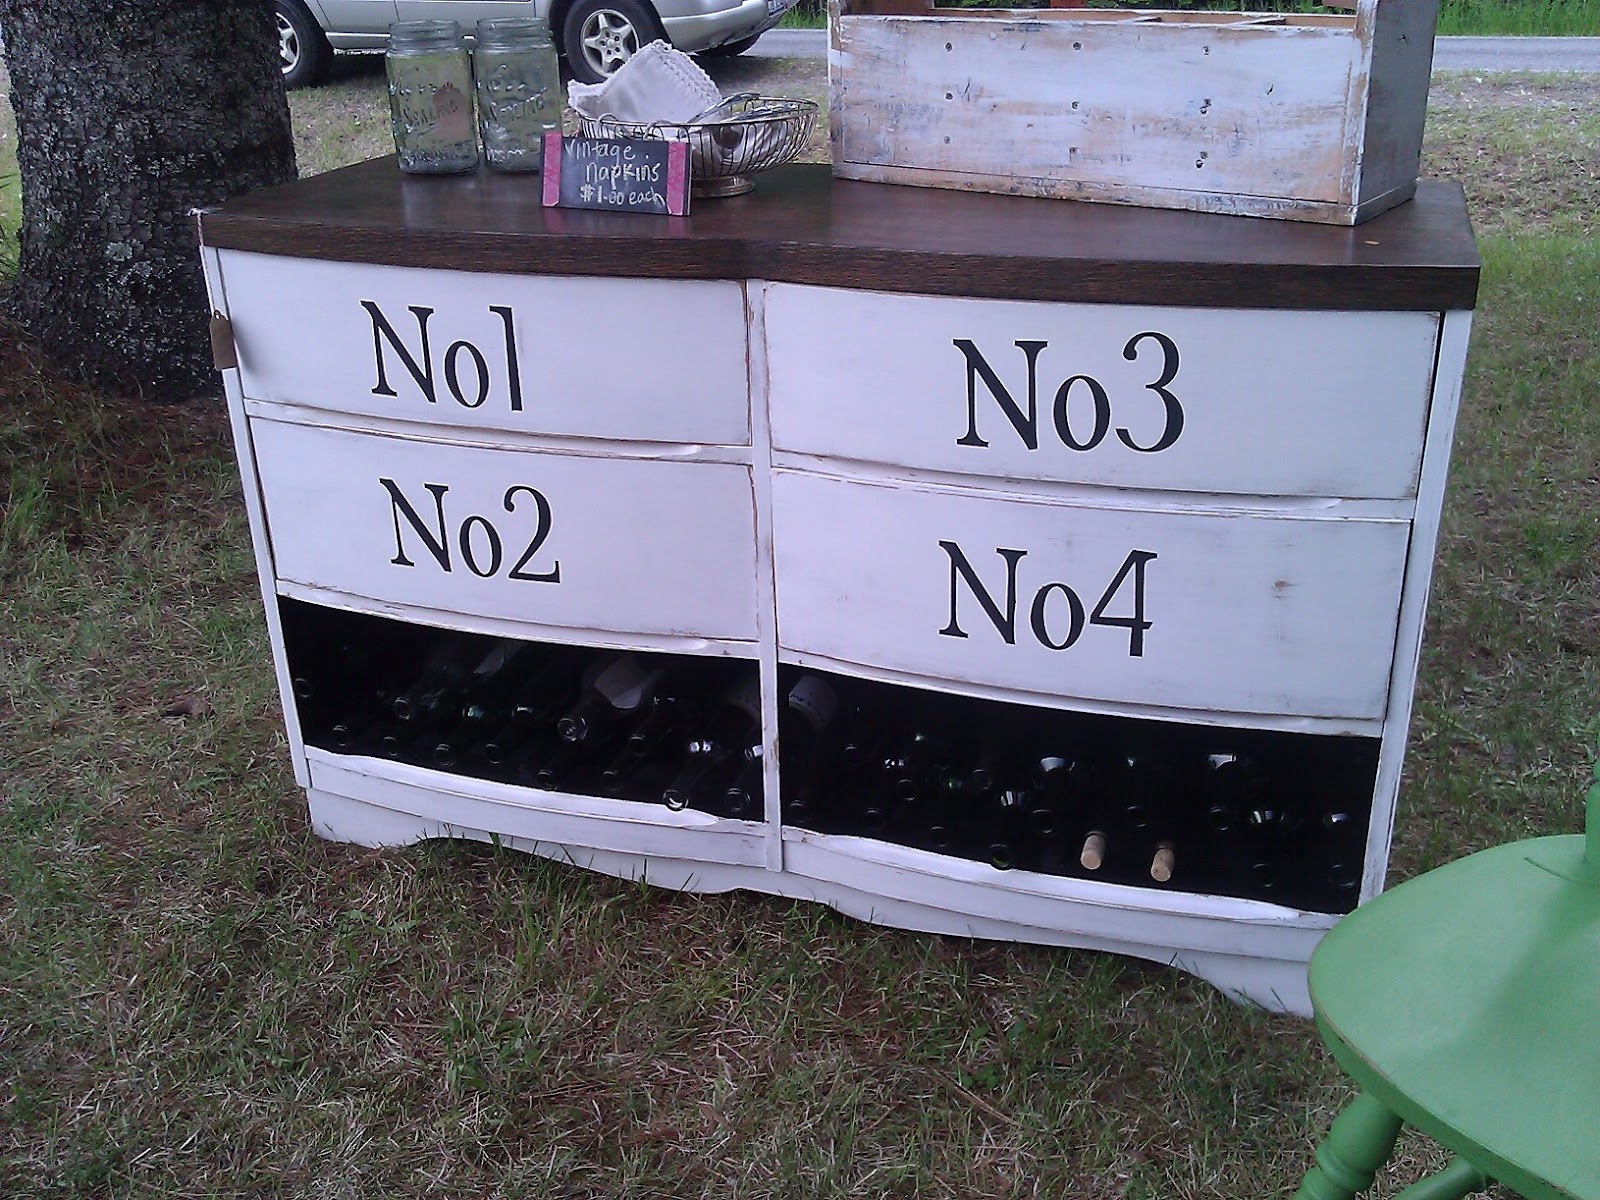

After, at the sale:
The bottom fits about 48 wine bottles perfectly!
(or 2 -4 baskets, or little curtains)


And after, during the sale:)
I had planned on putting handles on it, but Amy had this great idea. So I went home, printed a stencil and sat there at the sale updating it. What do you think??

And now that it is here in my dining room, I'm tempted to keep it:)


But, alas, it is for sale.
$100 will get it for your home:) SOLD

The other piece is a table that had a veneer top to begin with:

My hubby and my dad redid the top for me, We were going to do pallet boards, but had this cool barn wood looking pieces.

I stained the top and painted and distressed the bottom. And here it is finished at the sale:


$100 will get you this one too! (SOLD)

I love both of these and am sad to let them go. But, who needs 2 kitchen tables?? :)

And lastly, today I opened up a booth at the local 'Crafters Mall'. Here's a sneak peak at my first set up of the space:


Its a pretty small space, so while I'm trying to figure out how to get more furniture pieces in there here's an idea of what you can find there for now:
custom dishtowels, nightstands, chairs, chalk boards, jewelry/memo boards, pin cushions, baby wipe cases, lace jar vases and some decorative dishes.

Make sure you you check it out along with all the other booths at Foxs Fun Factory Crafters Mall on hwy 200 across from the mall!!!

That side table up there is #28 and I didnt get a shot before putting it in my booth! Here is the before:

**UPDATE: It just sold, but here she is:)


ONLY 2 more to my 30 before 30!!! Then what?! ANy ideas??


Sharing at

 
SITE DESIGN BY DESIGNER BLOGS