On this rainy blustery day, with a hurricane about to hit the East Coast( Bless you all) I thought it was the perfect day to post this yummy soup we've been enjoying over here at the Lytton home. I got a recipe from Real Simple, but switched it up a little for my liking. The great part is its so fast! Most fast recipes these days include lots of preservatives and chemicals which I'm not all about. So this ones fast and can be a "real" unprocessed meal!
Ingredients:
12 oz jar of salsa verde (this is the secret ingredient. It eliminates the simmer time because the flavors are already melded together.)I use the world table brand. It's sooo yummy! You can get mild, medium or hot to determine the heat of yours.
3 cups cooked chicken (I like to use rotisserie to be quick, but you can use ANY kind of chicken)
1 15 oz can white canelelli beans, drained
3 cups chicken broth
1 tsp. cumin(optional)
1 can of corn
1 can green Chili's
1 can of tomatoes
Empty the salsa into a large pot, cook 2 minutes over medium heat, then add the rest of the ingredients. Let simmer for 10 minutes and youre done!!
I top mine with tortilla chips, sour cream and cheese. You could also do green onions, olives, whatever you like!
What I love about this recipe is you can add and take away anything that you love or have in your cupboard. I added the green Chili's, corn and tomatoes to the original recipe because I wanted it to go farther and now I make it that way every time! I've also started adding more chicken and a can of black beans. You could also add kidney beans:)
You can add or take away broth to make it soupier or thicker. It's quick, pretty healthy and so versitle!
Enjoy!
Monday, October 29, 2012
Tuesday, October 23, 2012
Side Board redo
I got this piece on our local Facebook yardsale sight for $15 a few months back. I have always wanted some kind of sideboard piece for the kitchen or behind the couch, so Ive been waiting to this piece for our own home. Here she is before:
I painted her gray, distressed her, took off the existing handles and drilled new holes for these new beauties.
And after:
And all decorated up for fall:
Partying at:
Labels:
before and after,
DIY,
furniture,
holiday,
home decor,
paint
Pink month
I shockingly have not dealt personally with breast cancer in my life, but have lost many loved ones from other kinds of cancer. All I have to say is "I HATE YOU CANCER!"
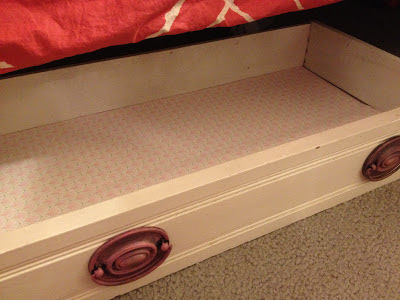
In honor of breast cancer awareness month I wanted to do a piece pink. With the crazy freezing weather, I decided to go for a drawer. Ive waned to make one for under my bed for awhile. I have, as Im sure most of you do, a sock monster living in my home and have an ongoing pile of mismatched socks waiting to be reunited with their mate and lover:) So I decided a cute little drawer right under my bed to hide them was a good solution. I added some handles that I painted pink and some pink wallpaper to line the inside.
To all you out there with the horrible C word in your life in any way: You are in my thoughts and prayers and this month and every other that a cure will be found.
Partying at:
Tuesday, October 16, 2012
Yaaay!!!!
I am being featured again by DIY by Design!!! This time for little Mj's nursery make over!
I just love her blog and am so greatful for the opportunity! Make sure you check it out after 8 pm EST tonight!! Thanks Judy!! Make sure to click here and check it out!
Saturday, October 13, 2012
How to make your own custom rubber stamps
I have always wanted a chevron stamp. Who doesn't these days right?? But the only one I could find was by Tori Spelling and was like $50. (Ill admit though, I make no apologies, I do love me some Tori)
So after seeing a few blogs on it like this one here from my ALL-TIME-FAVORITE- BLOG-I-READ-EVERY-SINGLE-DAY. I ordered a speedy carve block on amazon and my sister happened to have the carving tool set i needed. You can take any image (off the web, a magazine, a logo) and turn it into a stamp! For my chevron one I:
1. Traced some chevron fabric I had onto plain old printer paper (with a pencil, that's the important part)
You could use a printed image or anything else.
For this one I found this image online and then just altered it a little:
2. Place the paper on your carve block, image side down.
3.Rub over the image with a flat surface like a debit card.
4. Remove the image and you will have the penciled image now on the rubber.
5. Trace your image with a permanent marker or pen so it doesn't rub off while you carve.
6. Carve out the parts you want to be the 'negative space' on the paper.
7. Carve some more
8. Carve a little more
9. It will take a few practice stamps to see where you need to carve a little more.
10. Stamp beautiful things!!
I have gone a little crazy with my few favorite images and am in need of making a few new ones.
Ive done some on paper with a stamp pad, but mostly on fabric mixing acrylic paint and textile medium.(Theres not much of a fabric paint selection in our little town. neons and puffy paint mostly, so I just get the textile medium to mix with ANY of the beautiful colors that come in acrylics! You just follow the t.m instructions, and heat set it after.
Here are my favorite projects Ive done lately:
 |
| These directors chairs were my first project with the anchor. |
 |
| Redid the curtains in my laundry room |
 | ||
| This coffee table turned chevron bench. Take that expensive chevron fabric!!!
|
Thursday, October 11, 2012
Vintage vanity redo
I found this old vanity and brought her home earlier in the summer. I loaded her up in the back of the truck by myself(kind of awkward) because I knew what would happen if I asked for help with this one. And I was right. When I got home, my dad told me to throw it back and my husband looked at me like I was crazy and walked straight into the house. But come on!! My nana, grandma and great aunt were all beauticians and I kind of love me an old vanity. Even sans the mirror, hardware and two drawers. And even despite the fact that it was filled with spiders, leaves and what looked like potting soil.
And then came the silliness of it all. Those drawers will ONLY fit in those two spots. There's no moving both to one side, or moving them both to the top or bottom. So, then again, my dad said to throw it back. But I didn't:) I think she is so cute painted white and distressed and with thee old heavy handles from the Hobs. I thought about either making a fabric cushioned pad on the middle section or making cute little curtains over the shelves I made. I have tried to sell it a few times and this piece has stuck around much longer than most. What do you think? Should I make a padded top, or some curtains??
Wednesday, October 10, 2012
A nursery makeover!
I redid my sister, Robins office into a nursery a few months back for sweet baby Mckinley(who is now 6 weeks old!)
I keep meaning to go back and take better pictures, but never have, so I figured Id just do the post already:) I will come back and add more later when I can figure out how to get pics off my old phone. I have a few tutorials I took pictures for.
Heres the room just getting started:
(We didnt get the crib before. It was your basic wood crib and we painted it white.)
And after:(Its hard to get a shot of the whole room cause its so long.
 |
| Theres no closet in this room, so Robin came up with a great idea to utilize the space. This was originally her husbands desk, so he added a bar along the bottom to hang the itty bitty clothes. |
 |
| Heres the comforter on one side |
Partying at :
Labels:
before and after,
business,
crafts,
DIY,
family,
home decor,
kids,
paint,
signs
Tuesday, October 9, 2012
I always cry at weddings
I did some signs for a wedding recently. One that is coming up very soon here, in Hawaii!! So jealous. Someday I will make it there:) I learned a lot with this custom order. I love love love my cricut, but learned how hard it is to find just that right font you want. And buy!! Each font is almost $60! I have since been reading up on buying an attachment that allows you to send anything online to your cricut, but not sure if it works for mine.
Anyhoo, I cant wait to see these in wedding photos. But for now, here they are:
For the backs of the bride and grooms chair:
For the wedding and thank you card pictures(please excuse the mess on my counter:)
For the wedding and then at home after:
And for the backs of the chairs:
And a chalk board:
Congrats Analee! Cant wait to see the photos and hope to see you at your reception!
Sunday, October 7, 2012
I love Brits
These pictures don't do it justice. I love the dresser redo I finally did for my hubby! I know he loves the wood look, but I'm trying to lighten up our room. So I let him keep some distressed stripes of wood:) (and a whole other wood dresser I might add.) This is the first piece of furniture I have deemed male. His name will b Prince William:) Here he is:) before and after:
Partying at :
Tuesday, October 2, 2012
Color pops at its best
I have so many decorating styles lately I'm in love with. Here's one more to add to the insanity! So much white and clean lines, but with a bunch of color pops!! I'm loving it! Here's the link to the whole house! Check it out!!
http://6thstreetdesignschool.blogspot.com/2011/08/feature-friday-carley-kay-photography.html?m=1
http://6thstreetdesignschool.blogspot.com/2011/08/feature-friday-carley-kay-photography.html?m=1
Banana Nutella pumpkin bread (or muffins)
As promised, here's the yummy recipe I got from Pinterest :
Banana Nutella Pumpkin Bread
What you’ll need:
1 cup sugar
1 stick butter – softened
2 eggs
2 teaspoons pure vanilla extract
4 over ripe bananas – mashed
1 cup pumpkin puree
2 cups all purpose flour
1/2 teaspoon baking soda
1/2 teaspoon kosher salt
4 tablespoons Nutella – divided
What to do:
1. Preheat oven to 350 degrees. Add sugar and butter to your mixing bowl. Mix together until light and creamy. Add: eggs, vanilla extract. Mix until well combined. Add mashed bananas and pumpkin puree. Mix until well combined.
2. Add flour, salt and baking soda to a bowl. Whisk together to combine. GRADUALLY add flour mixture to wet ingredients. Mix until well combined. Batter will be thick.
3. Spray your muffin pans {or loaf pans} with cooking spray. Fill each 3/4 way full. Add 1/2 teaspoon Nutella to each. Using a toothpick, swirl Nutella through batter. Bake for approximately 40-45 minutes until bread passes the toothpick test.
(I did 2 muffin pans with liners minus 3 I think ,for about 21 minutes)
The girls were so delighted to have them for breakfast and the hubby even took some to work!
Mmmmmm.....I love fall!
Subscribe to:
Comments (Atom)


